Skip to content
If you’re trying to figure out how to fix a loose toilet paper holder, you’re not alone. It’s a recurring frustration that often points to improper installation. The most common culprit is mounting directly into drywall without suitable anchors, leaving the fixture prone to wobbling and eventual failure. With precise measurements and the right hardware, you can achieve a secure, long-lasting fit. This guide offers clear, step-by-step instructions for both drilled and no-drill methods, enabling a reliable installation in about fifteen minutes using standard tools.
Why Correct Installation Matters
Ensure Stability and Longevity
Select anchors that match your wall type to prevent loosening and structural damage. A toilet paper holder endures repeated pulling and lateral force, and screws set directly into drywall will fail quickly. High-quality anchors spread that load over a wider area, keeping the bracket firmly in place and safeguarding wall surfaces. Securing the holder correctly the first time eliminates repeat installations and replacement expenses that disrupt operations.
Meet Comfort and Accessibility Standards
Position the holder’s center approximately 26 inches above the floor and 8–12 inches forward from the toilet bowl for optimal reach in most home settings. In commercial or public restrooms seeking ADA compliance, adjust the center height between 19 and 36 inches according to accessibility requirements. Precise measurements taken before drilling ensure both ergonomic comfort and regulatory adherence, reducing the risk of costly rework.
Enhance Bathroom Aesthetics
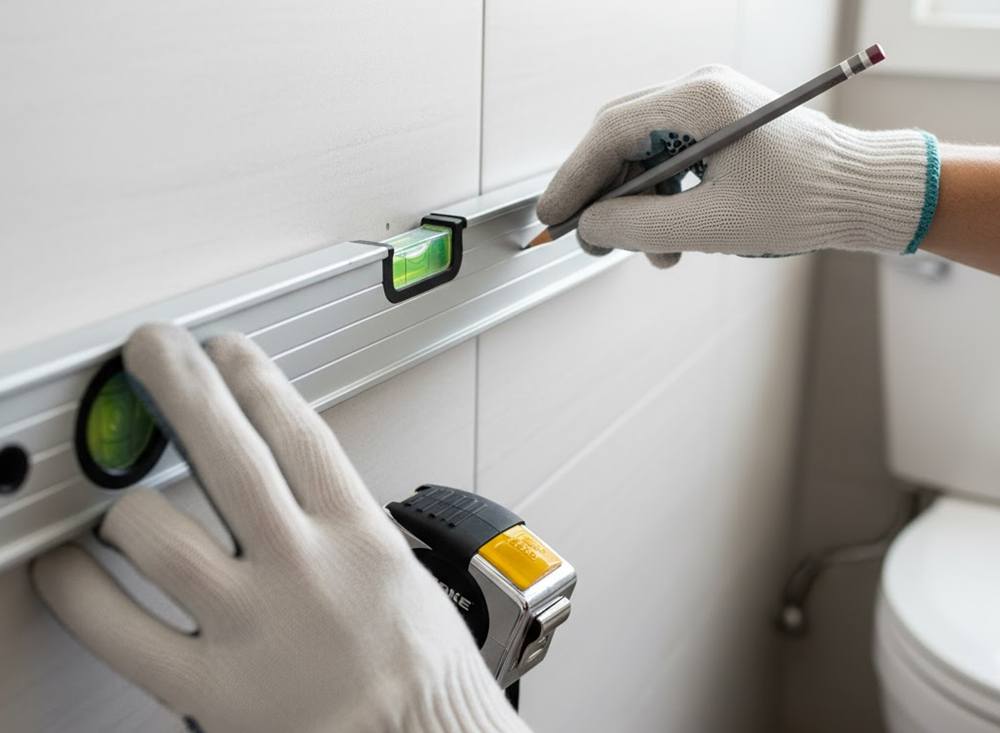
A precisely aligned holder contributes to a clean, professional bathroom appearance. Use a level to match horizontal lines with nearby fixtures, ensuring visual symmetry. Coordinate the holder’s finish with existing taps or hardware to create a cohesive design that supports brand integrity and leaves a positive impression. Attention to these details enhances perceived quality and maintains a well-kept environment.
Tools & Materials You’ll Need
Essential Tools for Reliable Installation
Gather all core tools before starting to prevent mid-task interruptions. Use a drill or screwdriver suited to your wall type to avoid stripping fasteners. Measure and mark placement precisely with a level, pencil, and measuring tape—misalignment causes uneven tension and early loosening. For drywall or tile surfaces, use nylon or toggle anchors to distribute pressure evenly. Keep an Allen key or small wrench ready for tightening set screws as per the manufacturer’s design. Prioritize safety by wearing gloves and eye protection when drilling or handling sharp hardware.
Guide to a No Drill Toilet Paper Holder Installation
For temporary or rental settings, adhesive or suction-mounted holders provide a clean alternative. High-quality adhesive versions perform best on smooth tile but always confirm their load rating matches your paper roll size. These options preserve wall finishes but cannot match the durability of anchored installations, making them ideal for low-traffic bathrooms or short-term use. Proper surface cleaning and full curing time are essential—skipping prep steps often leads to early detachment.
Selecting Durable Holder Materials
Material choice determines both service life and appearance. Stainless steel is corrosion-resistant and suited for heavy use, while chrome-plated brass delivers a polished look with long-term performance if properly maintained. ABS plastic provides a cost-effective choice but may crack under stress and lacks a premium finish. Balance upfront cost with durability—stainless and brass typically outperform budget alloys over time. Procurement leaders often favor Moen or EMTEK models for consistent quality, warranty assurance, and reliable finish matching across bulk orders.
Tailored Toilet Paper Solutions for Your Brand
Partner with Top Source Hygiene to develop premium, customizable toilet paper products crafted to your exact specifications. Leverage decades of manufacturing expertise, advanced production capabilities, and global delivery support to strengthen your brand’s market presence.
Step 1: Measure and Mark Your Spot
Determine the Correct Toilet Paper Holder Height
Begin with precise measurements. In most home bathrooms, mark 26 inches from the floor to the center of the roll for optimal reach. Position the holder 8–12 inches forward from the toilet bowl edge to ensure ergonomic access. In facilities for children or commercial spaces, adjust height according to applicable accessibility guidelines. Mark the centerline with a pencil to allow easy adjustments prior to drilling—careful preparation here eliminates rework and ensures long-term comfort and usability.
Verify Level and Symmetry
Hold the bracket template against the wall at your marked height and check alignment using a level. Avoid judging by eye—tile lines or wall patterns can create visual distortion. A truly horizontal installation maintains both functionality and visual balance, particularly in professional or customer-facing environments. Confirm alignment on both sides before drilling pilot holes, as correcting uneven placement afterward can cause wall damage and extend installation time.
Mark Drill Locations
Using the bracket as a guide, mark screw hole positions precisely according to manufacturer spacing. Ensure marks are visible but removable after work is complete. For tile surfaces, apply masking tape over each mark to prevent drill bit slippage and surface chipping. Recheck all measurements against bracket holes before drilling—accurate marking ensures secure anchor placement and helps prevent loosening over time due to misalignment.
Step 2: Mount the Bracket Securely
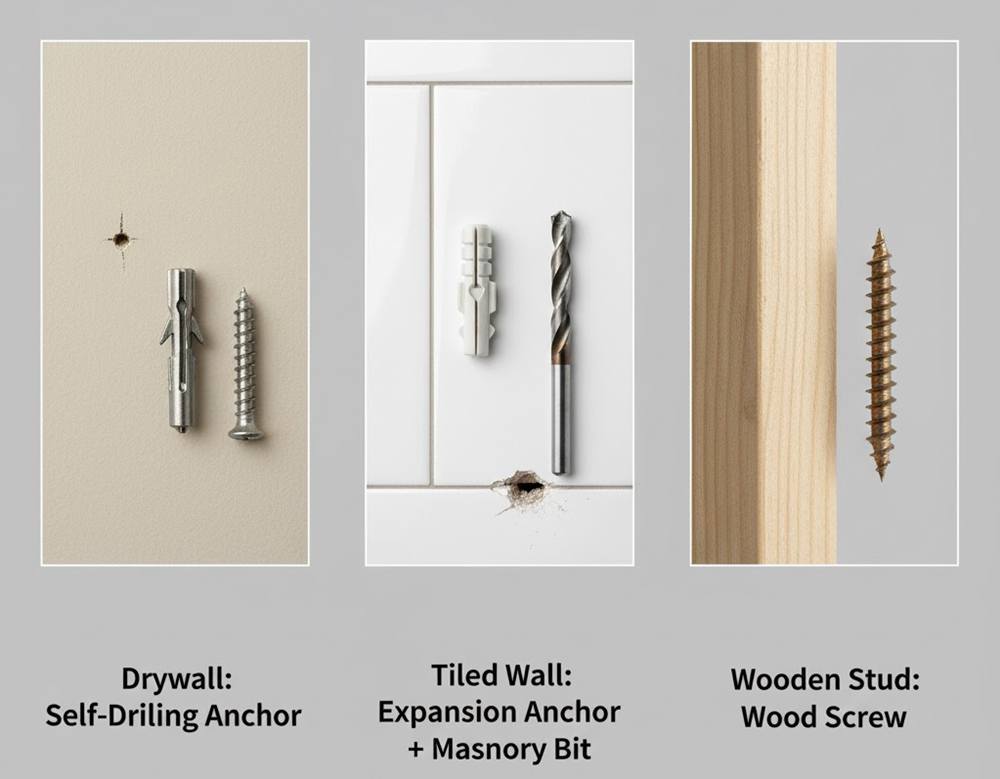
Select Anchors that Match Your Wall Type
Anchor selection directly determines how well the bracket resists daily wear. For the most common scenario, a toilet paper holder anchor for drywall, use self-drilling metal or toggle anchors for a stronger grip than thin plastic inserts. For tile or plaster, choose masonry anchors and pair them with bits rated for hard surfaces to prevent cracking and ensure a stable hold. If a stud is accessible, skip anchors and drive wood screws straight in for maximum strength. Avoid low-grade plastic options—they often split under pressure and lead to premature failures.
Drill Precise Pilot Holes and Set Anchors
Mark hole positions accurately, then drill a pilot hole slightly smaller than the anchor diameter to maintain a snug fit. A successful toilet paper holder installation on tile requires extra care. Cover the mark with painter’s tape to reduce bit drift, and drill slowly with a carbide bit to prevent chips. Seat anchors gently with a hammer until flush; forcing them can distort alignment and reduce holding strength. Each anchor should feel solid before proceeding—any looseness will undermine the bracket’s stability over time.
Secure the Bracket with a Level Finish
Align the bracket with installed anchors and check with a level as you tighten screws to avoid a lopsided mount. Apply firm but controlled torque—overtightening can strip anchors or crush drywall. Test with light side-to-side pressure to confirm there’s no movement. Screw heads should sit just recessed for a smooth, snag-free finish. This attention to detail ensures the bracket remains stable and visually aligned in both residential and commercial environments.
Step 3: Attach the Holder and Test
Secure the Holder to the Mounting Bracket
Fit the holder onto the bracket exactly as specified by the manufacturer, whether it’s an open-arm style or a spring-loaded mechanism. Fasten using the provided set screws, tightening with the correct Allen key or wrench. Apply firm but controlled torque to avoid stripping threads. Ensure concealed mounts sit flush against the wall for a clean, professional appearance, and verify that rotation or swing is smooth to support both comfort and long-term durability.
Verify Installation Stability
Test the fixture by applying measured pressure in multiple directions to confirm the bracket and anchors remain rigid. Any movement or unusual sound may indicate that a screw or anchor is not properly seated. Address instability immediately—retighten hardware or replace anchors where needed—to prevent loosening, minimize maintenance needs, and protect the restroom’s professional presentation.
Final Clean-Up and Presentation
Wipe away dust and pencil marks with a damp cloth, leaving the wall and fixture spotless. Polish metal surfaces to match surrounding hardware and enhance visual consistency. In multi-accessory installations, ensure finishes align across all elements for a cohesive, branded look. Schedule a follow-up check after several weeks to confirm the holder’s stability, catching minor issues early to avoid costly repairs and maintain user satisfaction.
Expert Tips & Common Mistakes
Pro Installation Insights
Verify all measurements before drilling—precision at this stage eliminates costly corrections later. Use painter’s tape to temporarily hold screws or brackets while marking holes; this secures hardware and frees both hands. In high-traffic environments, applying a small amount of thread sealant to fasteners helps prevent loosening over time. When installing on tile, drill slowly with steady pressure to preserve the surface glaze, and avoid impacts that can cause cracks and expensive replacements. These practices keep installations durable, minimize downtime, and maintain a professional finish.
Frequent Pitfalls to Avoid
Skipping wall anchors is a leading cause of premature failure—drywall alone cannot handle repeated torque. Overdriving screws can crush drywall or strip threads, compromising structural integrity. Incorrect placement relative to the toilet often results in poor user ergonomics, a common facility complaint. Neglecting compatibility between bracket, fasteners, and wall materials risks corrosion and weak grip. Proactively addressing these risks during installation safeguards both user comfort and long-term performance, reducing maintenance issues and protecting your investment.
Frequently Asked Questions
What Is the Recommended Mounting Height?
In most residential bathrooms, positioning the roll’s center at approximately 26 inches above the floor ensures comfortable reach. ADA guidelines specify a range between 19 and 36 inches to meet accessibility needs. Measure in relation to the toilet’s placement and user requirements to achieve optimal usability.
What Should I Do If There’s No Stud?
Use heavy-duty toggle or molly drywall anchors to ensure a secure hold. Screws driven directly into drywall often loosen under repeated use. Always match anchor type to wall material to maintain stability and avoid future repairs.
Can I Install a Holder Without Drilling?
Adhesive or suction-mounted holders work well on smooth surfaces such as tile for light-duty use. Confirm load capacity, clean the surface thoroughly, and let adhesives cure fully before placing the roll to ensure a reliable bond.
How to fix a loose toilet paper holder?
The first step is to tighten the toilet paper holder by using an Allen key on the set screws, which are usually located underneath or behind the holder. If movement persists, replace any worn anchors or stripped screws to restore strength. In high-traffic environments, upgrading to metal brackets and quality hardware often prevents recurring instability.
Final Thoughts
Completing a precise installation sets the foundation for long-term reliability. Accurate marking and the correct choice of wall anchors ensure your holder remains stable and properly aligned through daily use. This attention to detail prevents avoidable service calls and keeps restroom fixtures looking professional and orderly.
Anchors are essential for drywall or hollow wall applications, as they distribute load effectively and stop gradual loosening. With this skill mastered, you can approach related installations—such as towel bars or shelving—with confidence, applying the same methodical approach to achieve durable, high-quality results.