Skip to content
 ")
Testing Samples is the last line of defense between clogged plumbing that halts facility operations and expensive downtime or regulatory fines. Skipping quick, repeatable checks leads to emergency roll swaps, unplanned maintenance, and supplier disputes that push costs up and put contracts and reputation at risk.
This guide functions as a technical SOP for on-site quality control: you’ll learn how to run and record the Mason Jar Dissolvability Test (the 15-second rule), perform a Caliper Audit to verify core size and sheet width, run a wet tensile puncture protocol, carry out a lint-shedding assessment on a black surface, and check embossing adhesion on 2-ply samples. It also explains the risk of ordering FCL (full-container load) shipments without rigorous testing and gives pass/fail criteria, sampling frequency, and a FAQ section covering sample requests, core checks, and dissolution verification before you approve large orders.
The Risk of Ordering FCL Containers Without Rigorous Testing
A single unchecked 40HQ shipment can convert a supplier mistake into weeks of inventory disruption, direct replacement costs, and lasting brand damage.
Hidden Quality Issues That Surface After Delivery
Buyers see the consequences of poor controls only after unloading a full container: damage that testing would have caught becomes a logistical and commercial headache. These defects often render large volumes unsellable, trigger returns, and create compliance headaches with import authorities and retail partners.
- Physical damage from stacking or poor palletization: crushed rolls, broken cores, torn packaging.
- Moisture and contamination introduced during transit or at origin: staining, mold risk, and reduced sheet integrity.
- Material mismatches versus specification: wrong GSM, ply count, or pulp type that affects softness and absorbency.
- Packaging failures that expose goods to pests or humidity, increasing waste and disposal costs.
- Noncompliant labeling or missing certification marks that lead to customs holds or retail rejection.
Financial and Operational Costs of Unverified FCL Shipments
Unchecked full-container loads create direct replacement expenses and substantial indirect losses: lost sales, penalties, and extra working capital while stock sits in quarantine. These costs scale fast with container size and shipment frequency, and they erode margins on every unit sold from that shipment.
- Direct replacement and return shipping costs for rejected batches and the administrative burden of claims.
- Lost sales and retailer penalties when product fails in-store audits or fails to meet buyer specs.
- Inventory disruption and increased working capital when goods are quarantined or await testing.
- Rework, repackaging, or disposal expenses if products are out of specification or contaminated.
- Damage to brand trust from customer complaints and negative reviews that can reduce repeat business.
Why On-site and Pre-shipment Testing Matters
Pre-shipment checks shift risk left—catch defects before the container locks and carriers bill you for ocean freight and duties. Inspections and lab verification give buyers objective evidence to force corrective action or avoid costly shipments altogether.
- Early sample verification avoids full-container exposure to defects; many suppliers provide stock samples and custom samples for review.
- Factory inspections confirm production processes, raw material sourcing, and correct packaging before loading.
- Lab tests validate key parameters such as tensile strength, absorbency, caliper, and contamination screening.
- Pre-shipment photos and loading supervision reduce the chance of improper container loading and mixed SKUs.
- Third-party inspections offer objective evidence for claims and speed dispute resolution with suppliers or carriers.
Practical Pre-shipment Checks for Buyers
Implement a short, prioritized checklist that an inspector or your QC partner can execute before approving a container for shipment. Tie commercial terms to inspection outcomes so suppliers have a clear incentive to meet specs before loading.
- Request and compare physical samples against the agreed specification, including GSM, ply, sheet size, and core dimensions.
- Require documented lab test results for critical attributes and copies of relevant certifications (ISO, FSC, FDA where applicable).
- Schedule a factory or third-party pre-shipment inspection covering random carton checks, pallet integrity, and container condition.
- Verify packaging labeling, batch numbers, and packing lists match the purchase order to prevent mixed shipments.
- Confirm container seals, record container temperature and humidity readings for sensitive goods, and photograph load configuration at loading.
- Include contractual holdback or partial payment clauses tied to passing inspection to motivate corrective action before shipment.

Test 1: The Mason Jar Dissolvability Test (15-Second Rule)
A rapid bench-screen: a 15-second, controlled agitation in a clear jar delivers a repeatable pass/fail signal for short-term dissolvability, but it does not replace septic or wastewater testing.
Purpose and scope of the Mason Jar test
Objective: assess short-term disintegration of flushable products under tightly controlled, repeatable bench conditions tied to a 15-second observation window. Use this as a quick go/no-go screen during R&D, incoming QC, or pre-shipment checks to flag products that clearly fail rapid breakdown expectations. Limit scope to bench-top screening only — the method does not predict performance in sewer conveyance, aggregate sewer hydraulics, or treatment plants.
Materials, equipment and test setup (proposed)
Standardize materials and setup before you run comparisons. Use a documented jar type, controlled water chemistry and temperature, a defined sample unit, and a repeatable agitation pattern. Include positive and negative controls on every run and capture timed photos or short video for audit trails.
| Parameter | Typical Bench Protocol | Top Source Hygiene Recommendation |
|---|---|---|
| Container Water Sample Agitation Controls Recording | Standard 16‑oz clear mason jar; dechlorinated tap water at 20–25°C; one sheet or defined mass; manual shake 15 s (fixed stroke count) or mechanical shaker; include fast-break & non-break controls; stopwatch + photos/video. | Log jar brand/volume and exact water volume; use OBA‑free product samples, dry condition, record ply/GSM; set mechanical shaker rpm when available; require ≥3 replicates and photographic evidence stored with batch ID. |
Step-by-step procedure and acceptance criteria (15-second rule)
Follow a strict sequence and treat timing as the controlled variable. Run at least three replicates and report the proportion that pass the acceptance rule. Define fragment-size and floating-core thresholds before testing to avoid subjective calls.
- Step 1 — Preparation: fill the documented jar volume with dechlorinated water at the set temperature (20–25°C). Note pH.
- Step 2 — Add sample: drop the defined sample into the water surface and start the stopwatch immediately.
- Step 3 — Agitation: apply the pre-defined agitation (e.g., 15 s at 120 shakes/min manual pattern or mechanical shaker set to Y rpm).
- Step 4 — Observation: stop at 15 s, inspect for intact pieces >10 mm, floating cores, or cohesive sheets; record pass/fail.
- Step 5 — Replicates & reporting: run ≥3 replicates; report pass rate, time‑to‑disintegration if relevant, residual particle characteristics, operator ID and photos/video.
Acceptance example: pass = no intact fragments >10 mm and no floating core after 15 s of standardized agitation; any intact pieces or floating cores = fail. Keep photographic evidence linked to sample IDs for traceability.
Limitations, validation needs and recommended next steps
Treat jar results as indicative, not definitive. The method responds strongly to water temperature, agitation energy, and sample mass. Use mason-jar screening to triage batches, then validate suspicious or borderline products with accredited disintegration, biodegradation, or septic-system tests.
- Limitations: bench conditions do not reproduce sewer hydraulics, retention times, or biological degradation in treatment plants.
- Validation needs: correlate jar outcomes with lab-standard tests (e.g., ISO/ASTM methods or accredited septic tests) and record correlation coefficients.
- Additional metrics to capture: time-to-50% mass loss, particle-size distribution post-agitation, turbidity, and repeatability (CV across replicates).
- Quality controls: train operators on exact agitation technique, maintain a control chart, and require photographic evidence for audit trails.
- Next steps: pilot the protocol on representative SKUs, refine acceptance thresholds based on correlation data, then include the jar test as a documented QC gate for incoming lots.
Boost Margins with OEM Toilet Paper
Test 2: The Caliper Audit (Checking Core Size and Sheet Width)
A disciplined caliper audit catches dimensional drift early, preventing dispenser failures, trimming waste, and costly rework before a full-container shipment.
Why Caliper and Core Size Matter
Caliper (paper thickness) determines absorbency, hand feel, and how many sheets fit per roll. When caliper varies across a production run customers report inconsistent performance and dispensers jam; on the factory floor inconsistent caliper signals machine setup drift or felt/doctor blade wear that you must correct before scaling production.
Core inner diameter (ID) and wall thickness control dispenser fit and pallet packing density—wrong cores cause handling delays, special adapters, or wasted carton space. Sheet/web width affects trimming loss, wound-roll balance and nominal sheet counts; a few millimetres off specification multiplies into significant converting losses and customer complaints in hospitality and commercial accounts.
Recommended Tools and Standards
Use purpose-built instruments: a paper micrometer with ~0.001 mm (1 µm) resolution for caliper, a digital/vernier caliper for core ID/OD and wall thickness, and a steel rule or tape for sheet width. Condition samples and document instrument calibration before starting any audit session.
Follow ISO/TAPPI methods for repeatability: condition at 23°C ±1°C and 50% RH ±2%, use ISO 534 or TAPPI T 411 for caliper measurements, and record instrument model plus calibration date. Zero-check instruments on a certified gauge block and re-check zero after every 10–20 readings.
| Measurement | Recommended Instrument & Resolution | Standards / Conditioning |
|---|---|---|
| Caliper (µm), Core ID / Wall, Sheet/Web Width | Paper micrometer (~0.001 mm / 1 µm); digital/vernier caliper for ID/OD; steel rule or tape for width | Condition at 23°C ±1°C, 50% RH ±2%; ISO 534 / TAPPI T 411; note instrument & calibration date |
Step-by-Step Audit Procedure
Sampling: for routine lots pick 5 rolls per production lot/container; for new suppliers or process changes increase to 10. From each roll take samples at the left edge, center, and right edge of the web so you capture cross-web variation. For caliper take 10 readings per roll across those three positions (≈30 readings per roll).
Analysis: report every reading, compute mean caliper (µm), standard deviation and coefficient of variation (CV% = SD/mean × 100). Measure core ID and wall thickness at two orthogonal positions and average. Typical acceptance guidance: caliper tolerance ±5% of target or absolute ±10 µm for tight specs; core ID tolerance ±3 mm; core wall ±0.5 mm; sheet width tolerance ±2–5 mm depending on product class.
Recording Results, Reporting, and Escalation
Document everything in a standardized QC form or spreadsheet. Include contextual metadata so results trace to machine and material: lot/container number, production date, machine ID, operator, conditioning conditions, instrument type and calibration date, raw readings, mean, SD, CV and pass/fail. Attach photos showing roll ends, core measurement points and any visible defects.
- Mandatory fields: lot/container number, machine ID, operator, conditioning T/RH, instrument model and calibration date.
- If results fail: quarantine the lot, re-measure two additional random rolls, and run the root-cause checklist (machine setup, tooling wear, raw material batch).
- Escalation: notify production QC and the supplier, log corrective actions, require rework or replacement when re-tests confirm out-of-spec conditions.
- Trend tracking: store mean and CV over time to spot drift before it reaches spec limits; flag trends that show steady mean shift or rising CV.
- Quick auditor checklist: instruments zeroed and calibrated; samples conditioned; measurements at left/center/right; core ID and wall measured at two axes; results averaged and compared to spec; photos and notes attached.
Test 3: The Wet Tensile Strength Puncture Test
A wet puncture test quantifies how much force a wetted tissue sheet tolerates before a localized failure, giving a direct indicator of in-use durability in moist conditions and a decision metric for fiber, ply and additive choices.
Purpose and scope of the test
Run this test to measure the peak force and energy a wet sheet resists before a puncture or catastrophic failure. Labs and manufacturers apply it to toilet paper, jumbo rolls, kitchen towels, facial tissues and wet wipes where users expect the material to remain intact when damp. Use results to compare suppliers, validate formulations, and predict field performance such as resistance to tearing during cleaning or flushing.
Use outcomes to guide product development: adjust fiber blend, ply count, embossing pattern, or wet-strength additives when the test shows insufficient wet resistance. The test also helps balance wet strength against softness and cost in commercial specs.
Sample preparation and conditioning
Cut test specimens to the lab-specified dimensions and mark orientation (machine direction vs cross direction). Condition samples at a controlled environment (commonly 23±2°C and 50±5% RH) for at least 24 hours before wetting to remove pre-test variability. Record grammage, ply count and any surface treatments for every sample.
Wet samples using a defined procedure: either fully submerge in distilled water for a fixed time (typical 5–10 seconds) or apply a calibrated spray; then blot consistently to remove excess surface water. Test multiple replicates from multiple rolls (recommendation: ≥10 replicates across 3 or more production lots) to capture within-batch and lot-to-lot variability.
| Parameter | Typical lab ranges / method | Top Source target (example) |
|---|---|---|
| Peak puncture force (N) Energy to puncture (area under curve) Displacement at failure (mm) Conditioning / Wetting / Replicates Probe geometry / Crosshead speed | Facial tissue: ~0.3–1.0 N; Household TP: ~1–8 N; Kitchen towel: ~8–30 N (depends on construction). Energy and displacement scale with force. Condition 23±2°C, 50±5% RH; submerge 5–10 s in distilled water; blot uniformly. Probe: hemispherical 2–3 mm tip. Crosshead: 50–100 mm/min. Replicates: ≥10 from ≥3 rolls. | TSH household (2–3 ply): peak 3–6 N target; energy and displacement matched to softness profile. Conditioning 23°C/50%RH; submerge 5 s; probe 2.5 mm hemispherical; crosshead 50 mm/min; 12 replicates (4 rolls × 3 spots). |
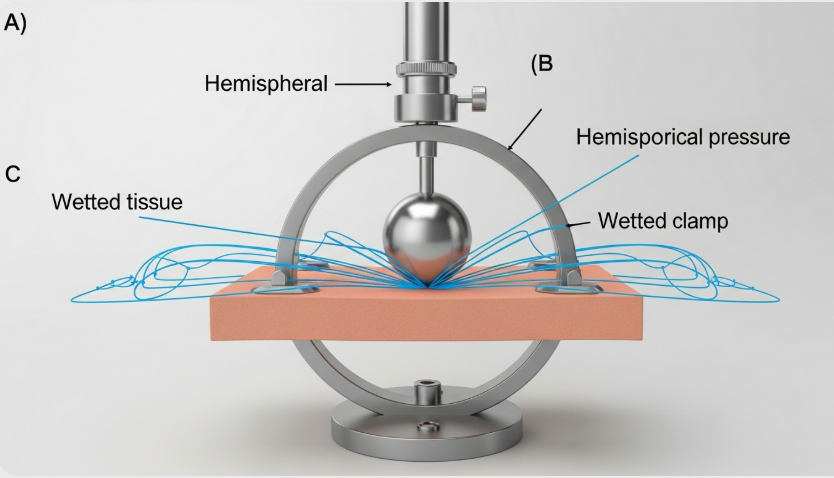
Test apparatus and procedure
Use a calibrated tensile testing frame fitted with a puncture probe or mandrel and fixtures that clamp the sheet edge without pre-stressing it. Place the wetted specimen over a support ring sized to the standard and align the probe perpendicular to the sheet surface to ensure localized loading. Define probe geometry in the method—rounded tips produce different failure modes than sharp tips, so keep geometry consistent for comparisons.
Set crosshead speed and probe travel to the lab standard or customer requirement to control loading rate. Start the test and record the force-versus-displacement trace until the probe punctures. Capture peak force from that trace and retain the raw curve for energy calculations. Run the full replicate set across multiple rolls or batches to reveal process variation.
Data capture, calculation, and interpretation
Capture peak puncture force, energy to puncture (area under the force-displacement curve) and displacement at failure for each replicate. Store raw traces for trend analysis and root-cause work. Normalize force values by sheet width or grammage when you compare different formats to remove geometric bias.
Report mean, standard deviation and sample size; flag outliers and analyze batch trends. Higher peak force and greater energy indicate stronger wet resistance. Use these metrics alongside softness and cost inputs to make product trade-offs: stronger wet strength often requires different fiber blends or additives that can affect handfeel and price.
Acceptance criteria, typical ranges, and reporting
Set acceptance thresholds based on intended use: delicate facial tissues tolerate much lower puncture forces than heavy-duty kitchen towels. Define supplier-specific targets during sampling and validation rather than relying on generic industry numbers. Typical ranges vary by product and formulation; document the target, acceptable tolerance band, and the required corrective action levels in the spec.
Always include method details in reports: probe geometry, crosshead speed, conditioning, wetting protocol, orientation, and number of replicates. When a lot fails, recommend actions such as reviewing pulp fiber mix, adjusting wet-strength additive dosing (e.g., cationic starch or wet-strength resin), improving ply bonding or modifying embossing pattern. Retest after corrective action and require supplier root-cause documentation before release.
Test 4: The Lint Shedding Assessment (Black Surface Test)
A simple dark-background rub test quickly reveals visible fiber transfer that correlates with customer complaints on black fabrics and dark-service surfaces.
Purpose and scope of the black surface test
Use the black surface test to detect visible lint or fiber transfer that shows up on dark backgrounds after controlled contact with a tissue product. Procurement teams, hotel operators, and QC engineers rely on this test when visible fibers damage perceived product quality on items like uniforms, black upholstery, or napkins.
The test measures macroscopic fiber transfer only. It does not measure microscopic dust, chemical residues, or long-term abrasion effects beyond the test cycles used. Treat results as a surface-appearance metric that informs specification decisions and corrective actions.
Sample preparation and test setup
Select random rolls or sheet samples that represent the production lot. Condition samples at stable laboratory conditions before testing—typical target: 23°C ±2°C and 50% RH ±5%—to limit variability from moisture or static. Note ply count, embossing pattern, winding direction, and any surface treatments before you start.
- Background material: use a uniform, matte black cloth or felt to maximize contrast and make lint obvious.
- Contact method: use either a standardized mechanical abrader (fixed stroke or rotary head) or a defined manual rub with a fixed weight; record number of rub cycles, contact area, and applied pressure. Use a simple weight (for example, 500 g) or a force gauge to standardize pressure when you use manual rubs.
- Reproducibility: run at least three replicates per sample and include a control (known low-lint reference roll) to validate the setup.
- Documentation: log roll direction, ply, embossing depth, winding tension, and any finishing steps that could affect lint release.
Scoring, acceptance criteria, and reporting
Adopt a simple 0–5 visual rating scale (0 = no visible lint, 5 = heavy coverage) and provide photo references for each grade so different testers stay consistent. For customers who need numeric thresholds, supplement visual grading with digital image analysis or particle counting on photographed samples.
- Acceptance examples: set 0–1 for premium hospitality products, 2–3 for general-purpose commercial rolls, and 4–5 trigger corrective action or rejection.
- Report contents: include sample ID and lot number, test conditions (cycles, pressure, temperature/humidity), photos before/after, numeric/visual score, tester name, and date.
- Trend tracking: log scores across batches in a central QC register. Flag upward drift of lint scores for root-cause analysis and corrective plans.
Common failure modes and mitigation strategies
Visible lint on black surfaces usually stems from short-fiber furnish, low fiber bonding, aggressive creping, or converting and handling steps that break or loosen fibers. Pay attention to rewinding tension and embossing edges—those process variables often create loose fiber buildup at roll edges.
- Mill-side fixes: increase fiber bonding via additional refining or bonding agents, select longer-fiber pulp where feasible, and optimize crepe ratio and drying profiles to reduce cut fibers.
- Converting fixes: lower slitting and rewinding tension, soften embossing patterns that introduce sharp edges, and inspect roll edges for loose-fiber rings after slitting.
- Post-processing and packaging: apply light calendaring or a thin surface treatment to lock fibers, wrap finished rolls immediately to prevent abrasion, and use inner wraps that minimize movement in transit.
- Operational controls: include the black surface test in incoming inspection, run periodic on-line sampling at the converting line, and require corrective-action plans when lint scores exceed defined limits.

Test 5: Verifying Embossing Adhesion on 2-Ply Samples
Embossing adhesion determines end-user integrity and manufacturing yield—measure peel forces and failure modes under controlled conditions so you catch bonding issues before a full run ships.
Sample Preparation and Conditioning
Select at least 10 representative sheets from the same production lot, and include samples taken along both the machine direction and cross-machine direction when embossing orientation matters. Mark ply orientation and sample location on each sheet so you can correlate failures to specific roll positions or process settings.
Cut samples to a standard test size—25 mm × 100 mm fits most peel and tensile fixtures—and label them with a unique sample ID. Condition all samples at 23°C ±2°C and 50% ±5% relative humidity for 24 hours, or match your facility’s QC climate if it differs. Record pulp type, embossing pattern, emboss depth, and any bonding or adhesive treatments used; keep that metadata with the test results for root-cause analysis.
Embossing Adhesion Peel Test Procedure
Use a tensile tester equipped with a 90° or 180° peel fixture. Set crosshead speed to 100 mm/min and run the peel across a 25 mm width; report peel force in newtons per 25 mm (N/25 mm). Capture force-displacement curves so you can distinguish steady-state peel from spikes that indicate intermittent bonding or pocket-related defects.
If you lack a tensile tester, perform a standardized tape test: apply a high-adhesion tape over the emboss area, press with a defined roller pressure, then peel at a steady angle and speed while observing whether plies separate or adhesive transfers to the tape. Photograph the peeled surface and inspect under magnification to classify the failure as cohesive (within a ply), adhesive (at the interface), or embossing-lift (pattern detachment).
Acceptance Criteria and Result Recording
Set numeric limits by product class and document them in the QC spec. For bonded embossing on toilet tissue, use a working threshold of 0.5–2.5 N/25 mm; kitchen towels and heavy-duty products will require higher peel values. Record mean, minimum and maximum peel forces and note any large force fluctuations that suggest localized defects.
Define visual pass/fail rules: accept only minimal adhesive transfer, no continuous delamination across the emboss area, and no continuous ply pull-through longer than 10 mm. Log test date, operator, sample ID, emboss pattern, peel forces, observed failure mode, and supporting photos in the QC record. Flag any batch with more than 20% failing samples for immediate production review and hold shipment until corrective actions close the issue.
Troubleshooting and Common Failure Modes
When adhesion falls short, look at the embossing mechanicals first, then materials and process chemistry. Use targeted trials that change one variable at a time—nip pressure, roll geometry, adhesive chemistry, or drying profile—to isolate the root cause.
- Low adhesion: often from insufficient embossing pressure or incorrect pocket geometry—raise nip pressure or refit the emboss roll profile and re-test.
- Poor adhesive bonding: check adhesive compatibility, cure/dry profile, and contamination—review adhesive formulation, increase oven temperature or residence time, and verify surface cleanliness.
- Delamination at pattern edges: typically caused by overstretching one ply—reduce emboss depth or redesign the pattern to distribute strain more evenly.
- Roll-to-roll variability: inspect roll alignment, temperature gradients, and raw-material moisture content—run a short controlled trial with fixed settings and re-check adhesion across the roll.
Conclusion
Testing samples before bulk orders protects operations and brand reputation by catching problems—poor dissolvability, weak cores, or excessive lint—before they reach customers. It also confirms septic-safe and regional compliance, reducing plumbing failures and costly chargebacks. Routine checks preserve product performance and supplier accountability over time.
Start by auditing your current stock or requesting the five core tests above, and record results against your technical specs. Contact Top Source Hygiene for certified samples, technical datasheets, and pre-shipment visual verification.
Frequently Asked Questions
How to test a commercial toilet paper sample?
Inspect and record basic specs first: ply count, sheet size, sheets per roll, roll diameter and core size, and GSM by weighing a counted sample of sheets; measure caliper with a paper micrometer and check embossing quality and perforation alignment. Perform simple functional tests: hand tensile/tear test, absorbency by dropping a fixed volume of water and timing absorption, lint test by rubbing a sheet over a dark surface, and a dissolution test using a bucket agitation and a toilet flush test. For deeper verification send samples to a lab for tensile strength, wet strength, disintegration and pulp analysis, and request supplier test certificates and relevant certifications such as FSC, ISO or ecolabels.
What to look for when buying wholesale toilet paper?
Evaluate product specs and economics together: ply count, GSM, sheet size, sheets per roll, roll OD and core size, packaging format and cases per pallet, and cost per 1000 sheets. Check performance attributes: softness, tensile strength, absorbency, lint characteristics, and disintegration for septic systems. Validate supplier credentials and logistics: minimum order quantity, lead time, MOQ, sample availability, QA documentation, certifications (FSC, ISO), price terms, freight options, and capacity to provide consistent QC and third party inspection on request.
How to test if toilet paper dissolves quickly?
Use three practical tests: 1) Bucket agitation test – drop a sheet in 1 L of room temperature water and agitate with a stirrer or by hand, recording time until the sheet breaks into small pieces; 2) Flush test – form a standard folded ball and flush in the model toilet or low volume flushing rig repeatably and note any blockages across multiple trials; 3) Blender or churn test – simulate vigorous agitation in a blender filled with water and time disintegration. Acceptable performance is typically rapid fragmentation under moderate agitation and consistent pass on flush tests across repeated trials; for contractual certainty request laboratory disintegration reports or third party septic compatibility testing.
How to check the core size of a jumbo roll?
Measure the inner diameter of the cardboard tube with a caliper or tape measure to get core ID, and measure tube wall thickness if you need the core outer diameter. Also record full roll outer diameter and roll width to confirm fit for dispensers. Common commercial core inner diameters you may encounter are approximately 1.5 inches (38 mm), 2 inches (51 mm), 2.25 inches (57 mm) and 3 inches (76 mm); always verify the dispenser specification before ordering and request the supplier state core ID in the spec sheet or on packing labels.
Why does toilet paper leave lint on surfaces?
Lint comes from loose or short fibers that are not strongly bonded into the sheet during manufacturing, a higher proportion of short recycled fibers, low calendering or insufficient fiber bonding, and from very soft, low GSM products where softness is achieved at the expense of structural integrity. Manufacturing settings such as creping, embossing and drying influence fiber lock and lint generation. To reduce lint choose higher GSM or two ply products, look for brands that advertise low-lint or lint-free technology, and specify manufacturing bonding treatments or tighter calendering for private label products.
Requesting samples from overseas paper manufacturers?
Prepare a clear spec sheet and sample request: include ply, GSM, sheet size, sheets per roll, roll OD, core ID, embossing, packaging and target order quantities. Contact manufacturers asking for 1 to 3 full rolls plus swatches, request test reports (GSM, tensile, disintegration), certifications (FSC, ISO) and a proforma invoice for sample charges and shipping. Agree on shipping responsibility and method (express courier for speed, air freight or sea LCL for cost), request photos and packing details, and consider paying for samples or using a refundable sample fee tied to a first order; finally arrange third party inspection or lab testing on receipt for final approval.